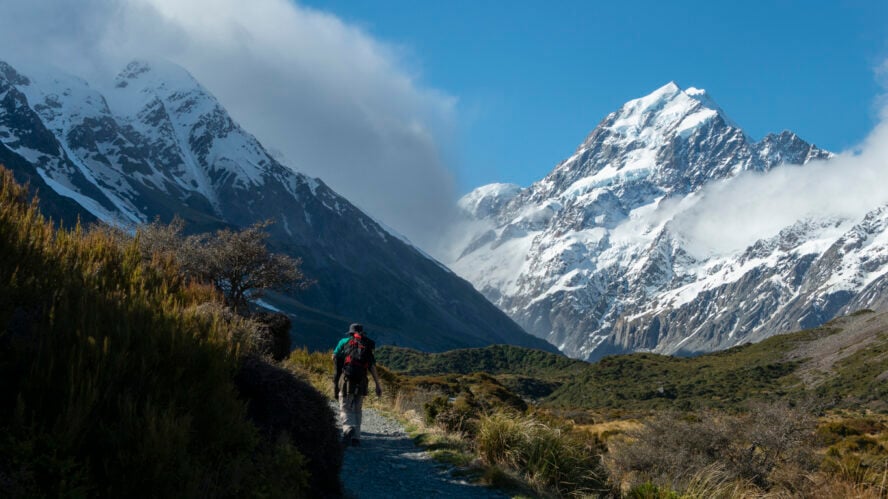

SoCal isn’t all desert and pavement (not that the California desert is a bad thing — see the best Joshua Tree hikes). With generally sunny weather, year-round snow-free trails, and easy access to peaks up to 11,000 feet, Southern California’s mountains are some of the most underrated hikes in the U.S.
There’s a reason why as a professional hiker, I’ve called this area home for 10 years. These are the summits that inspired me to start climbing peaks and became my training ground for Mt. Whitney. Now, they provide the outdoor fix I need when I can’t be thru-hiking. The six mountains in this guide are “must-climbs” for locals and out-of-towners alike.
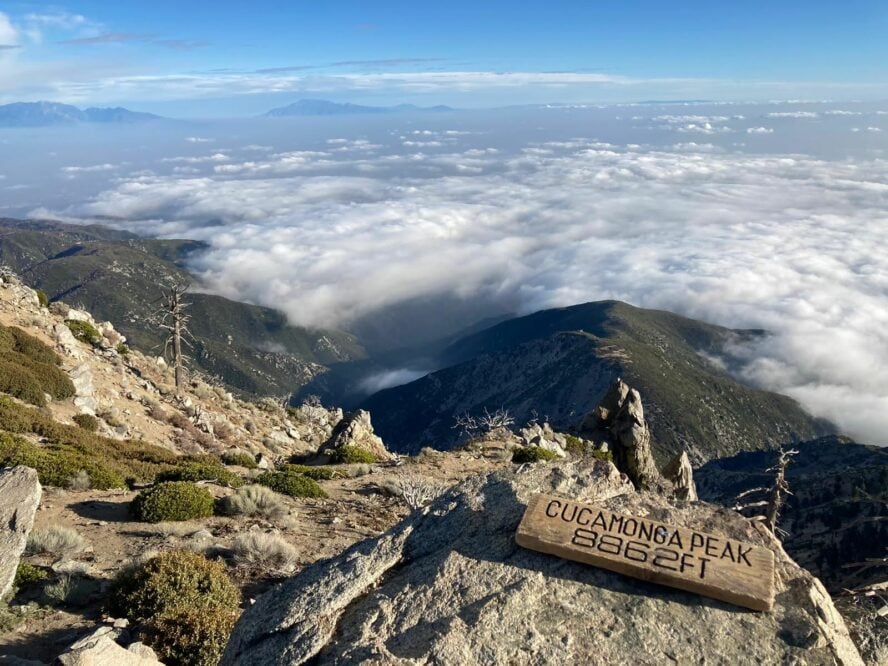
1. Cucamonga Peak
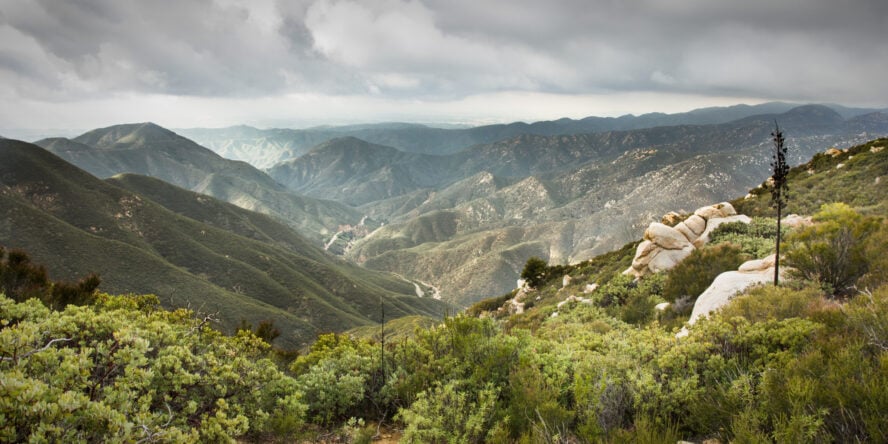
The top of Cucamonga Peak (8,859’) is one of the most photographed hiking destinations among Southern California’s mountains. Hikers love to grab selfies from the epic cliffy summit where the Inland Empire and Apple Valley sprawl endlessly below. You’ll also be able to see other notable peaks including Baldy (Mt. San Antonio), San Jacinto Peak, Santiago, and San Gorgonio. But this trek isn’t just about getting to a destination—I think every mile of this hike has some of the best views in Southern California, as vast as along the best Grand Canyon hikes.
With such amazing sights from the summit, a commonly asked question is, can you camp at the top of Cucamonga Peak? You can and there are plenty of flat areas both under trees and out in the open. Note that no campfires are allowed though, and if you plan to use a stove, you’ll need a campfire permit. Another consideration is the weather on Cucamonga Peak. Because it is more exposed and higher elevation it is typically 5-10 degrees cooler than the surrounding cities so plan accordingly.
It’s called Ice House Canyon for a reason
First things first, before heading out on the 12 mile round trip Cucamonga Peak hike you need a permit. You can grab a free day-use pass at the Mt. Baldy Ranger station, San Gorgonio Wilderness Association, or a self issue permit (if available) at the trailhead.
You’ll start at Ice House Canyon, which gets its name because it supplied ice to Los Angeles as early as 1859 before refrigeration. The trail follows the peaceful and wooded San Antonio Creek past old-timey cabins made of arroyo rock. In November, when the cottonwood and big leaf maples turn golden, Ice House is one of my favorite local places to catch some fall color.
Navigate the switchbacks like a local Bighorn
After about a mile, you’ll climb switchbacks, pass my favorite year-round spring in SoCal (top off your water here if you have a water filter) and reach Ice House Saddle. This is a great place for a snack break. If you’re still feeling energetic, follow signs for Cucamonga Peak.
The trail weaves along the mountain slope—sometimes with big drops right below. You’ll reach a notable saddle with views of Bighorn peak to your right and many switchbacks up Cucamonga to your left. Take those switchbacks, which are usually in decent condition but can be icy early and late in season. Continue up until you reach a post to a wide side trail on the right that leads to the broad summit.
One of my favorite things about Cucamonga is that despite being one of SoCal’s most popular summits, you can usually still find a shady and secluded area for picnicking away from the crowds. The highest point is the rocky outcrop, where you’ll likely see others grabbing photos that look like they’re standing on the edge of a cliff above all the sprawl. You may even get cell service to text your friends proof of your accomplishment.
Cucamonga Peak has one of the most epic views for a SoCal summit with a steep drop off and photo-taking spot worthy of your profile pic.


Cucamonga Peak - Good to Know
Advanced
~12 miles round trip
~4,300 feet
Free at the Mt Baldy ranger station in Mt Baldy Village. There may be some self-issued permits available at trailhead. Must have a permit to enter the Cucamonga Wilderness
6 to 10 hours
Early Summer
Parking is limited. If headed to the trailhead with friends on a weekend, park near the highway exit and carpool up
Take the 210 to Baseline following signs for Claremont. Turn north on Padua until it T’s with Mt. Baldy Road. Turn right, following the winding road up through two tunnels to the village of Mt. Baldy. Continue for about 2 miles. When the road makes a sharp turn left, stay straight to reach the Ice House Canyon parking lot
2. Ontario Peak
Ontario Peak (8,696 feet) isn’t far from Cucamonga Peak and is one of my favorite Baldy-area hikes because it sees a fraction of the foot traffic. I’ve even had the summit to myself on weekends before, a rare feat among popular SoCal hikes.
The Southern California mountain also has the advantage of being the most prominently visible peak from the Pomona Valley because it is closer to the front range than the other Baldy-area high. That means when you’re in the lowlands looking up at the mountains, there’s bragging rights to be had when pointing to Ontario and saying, “I’ve climbed that.”
Cucamonga’s smaller, wilder sister
Ontario Peak starts the same way as Cucamonga—in scenic Ice House Canyon filled with folksy cabins and the peaceful San Antonio Creek tributary. But after Ice House Saddle, you’ll break off on a signed trail heading southeast towards a ridge with epic views of the Baldy mountain area. So how long is Ontario Peak trail? Plan for about 12 miles round trip and 3,800 feet of elevation gain; even though it’s a slightly smaller mountain than Cucamonga you’re still in for a long trek.
From the saddle, you’ll travel in shaded lodgepole and sugar pine forest along a trail with a steep drop off that can get icy late in the season. After about a mile, you’ll reach Kelly Camp, named for a turn-of-the-century prospector. It was a trail resort in the 1920s and you can still see the ruins of the foundation. This also doubles as a large, flat forested camping area (if you have the proper permits), and it can get pretty crowded on the weekend.
Early in the season, there’s water from a spring, though as the temps heat up the water is less reliable. Consider filling up at Columbine Spring a mile before you reach Ice House Saddle.

Views all the way to the summit
From Kelly Camp, you’ll climb to exposed Ontario Ridge. Once on the spine of the ridge, I think those are some of the most unbeatable views of Mt. Baldy (officially, Mt. San Antonio), Timber, Thunder, and Telegraph Peaks. But the ridge is exposed and can get windy, so be sure to bring sun protection and on cooler days, sufficient warm layers.
About halfway to the summit, you’ll pass a junction with a rough use trail leading to the left towards Bighorn Peak (8,441 feet). Keep right, following the ridge on the better trail. Because you’ll hike near the tip of the ridge, it’s neat to pop your head over and look into canyons to the left and right of the trail. It almost feels like hiking in the Grand Canyon!
Towards the top, there’s a short set of switchbacks. I’ve found out the hard way they can get icy after the first snow and can stay that way later into the season. At the summit, while Ontario’s peak doesn’t have a lot of space to spread out, it makes up for it in character. Your photo choices include climbing a gnarled dead tree or scrambling out on a precarious rock cliff—both of which have amazing views of the valley below.
Ontario Peak is the perfect Baldy area summit for backpacking with the large and flat Kelly Camp about halfway to the summit.


Ontario Peak - Good to Know
Advanced
~12 miles round trip
~3,800 feet
Free at the Mt Baldy ranger station in Mt Baldy Village. There may be some self-issued permits available at trailhead. Must have a permit to enter the Cucamonga Wilderness. Adventure Pass ($5 parking fee) required
6 to 10 hours, can also do as an 1 to 2 night overnight backpacking trip
Early Summer
If you’re backpacking, get your overnight camping permit for Kelly Camp in advance, especially if you’re headed out for a summer weekend. You can put in a request for a permit as early as 6 months before your hike date
Take the 210 to Baseline following signs for Claremont. Turn north on Padua until it T’s with Mt. Baldy Road. Turn right, following the winding road up through two tunnels to the village of Mt. Baldy. Continue for about 2 miles. When the road makes a sharp turn left, stay straight to reach the Ice House Canyon parking lot
3. Strawberry Peak
Strawberry Peak (6,165 feet) is one of the most distinctive peaks in the area. When viewed from surrounding peaks (and from the LA Basin in general), you can identify it by the steep slopes that make it look like an upside-down strawberry. Luckily, while there are some options for steeper climbs to the summit, there’s also an intermediate-hiker friendly trail right to the top.
As the highest peak in the San Gabriels front range (and one of the few that is still open to hikers after the Bobcat Fire in 2020), you can get a great view (and work out) without the longer drives associated with some of the taller mountains in Southern California in this guide.

Accessible and short but not to be underestimated
The mountain is accessible, but how hard is Strawberry Peak? At about 7 miles round trip and less than 2,000 feet of elevation, I consider this a good intermediate hike. Because Strawberry is a bit shorter, it is also less likely to hold ice and snow than some of the other peaks in this article, making it a safer option for cooler season hiking.
Note that some of the forest around the trail burned in the Station Fire about 10 years ago, but the trail is clear. What that means is that there’s not a lot of tree cover, so bring plenty of sun protection and 2-3 liters of water.
The hike is sweet like strawberries and cream
The trailhead-picnic area-parking lot is off Highway 2 at the intersection with Red Box Road. You’ll need the $5 Adventure Pass for day use parking like all the other hikes on this list. After carefully crossing the highway, find the post that indicates the way to Strawberry Peak and the good trail paralleling Highway 2.
You’ll cross under a telephone wire but after about a mile, you’ll make a sharp turn left (west) onto the ridge and it starts feeling more wild. One of the tricky things about this hike is that it isn’t just straight up. You’ll have a few bumps to go up and over in the next mile. Still, after 2 miles, you’ll have incredible views of San Gabriel (6,162 feet, which is just a hair shorter than Strawberry Peak) and Disappointment Peak (5,960 feet) to your south. To your west, you’ll also see the massive Mt. Wilson (sadly, charred in the Bobcat Fire).
As you drop towards Lawlor Saddle, you may get your first views of Strawberry Peak. At the interaction with Strawberry Meadow, keep following the carbonite signs to the peak. It starts getting steep and rocky from here—even a little scrambly. Be sure to wear sturdy shoes and take it slowly. I had to use my hands to get around some of the bigger rocks. Although this hike is intermediate-hiker-friendly based on distance and elevation gain, the last steep ascent to the top is a challenge.
A SoCal hiker tradition
The ridge has a few false summits—so be prepared that when it may look like the top, you likely aren’t there yet! The summit itself is a brush-covered rocky bump but the sign is a clear declaration that you’ve made it. At the top you’ll have 360-degree views of the San Gabriels with Big Tujunga Canyon to the north and Mt. Baldy to the west. On a clear day, you may be able to see downtown LA or Catalina Island. And most important, a SoCal hiker tradition is to snack on strawberries at the peak.
Strawberry Peak is an easy-to-access front range peak that has 360-views and is hikeable almost every month of the year.


Strawberry Peak - Good to Know
Beginner-Intermediate
~7 miles round trip
~1,700 feet
Adventure Pass ($5 parking fee) required
3 to 7 hours
Fall, Spring
Eating strawberries on the summit is a SoCal hiking tradition. Don’t forget to bring some in your pack!
From La Cañada Flintridge, take Highway 2 (Angeles Crest) for 14 miles to the trailhead at the intersection of Highway 2 and Red Box Road
4. Sitton Peak
One of my favorite things about living in SoCal is the ability to climb snow-free mountains in the winter. Sitton Peak (3,275 feet) is one of the better options in the area for a longer hike and a little elevation during January and February. Another plus is the abundance of federally designated wilderness in the area. This hiking trail near San Diego lets you escape to the remote-feeling San Mateo Canyon without having to travel too far from suburbia.
Small elevation, big trip
Start at the large parking lot off Ortega Highway (Highway 74) across from the Ortega Oaks Candy Store, which sells the required $5 Adventure Pass for parking. The lot is one of the rarities in this neck of the woods because it has potable water and you’re going to want to top off your bottles before heading out.
The trail actually starts at the Bear Canyon Trailhead on the same side of the Highway as the Candy Store. Once the trail curls around the ridge, you cease to hear traffic as you descend among the oaks. Stay on the main trail for Sitton, turning right at a junction with the Morgan Trail (which leads back to a loop with the parking lot). You’ll curl around some ravines until reaching an intersection with the Verdugo Truck Trail. You can continue on singletrack or take the Truck Trail—they both lead to your next landmark: Four Corners.
Oddly, Four Corners is actually a meeting point of five trails and roads. But who’s counting? At this flat saddle, between higher points on the ridge, it has splendid views in both directions in part because the trees have thinned here. Follow the path up the Sitton Peak Truck Trail where the search begins for the true summit. There is a lesser defined trail that is not well maintained and the last quarter mile or so requires some scrambling or even bushwacking (depending on how overgrown it is). At the top you have your choice of summit sign pictures as there are usually a few lying around.
In the middle of it all
The first time I climbed Sitton I was surprised how steep the last push is, but pleased with the perch from the top. Afterall, the best part of this hike is the 360-views of the high peaks—San Jacinto, San Gorgonio, and even Cuyamaca or Palomar to the south—in all directions.
Sitton Peak is one of the best places in SoCal for some snow-free miles and and elevation gain during January and February.


Sitton Peak - Good to Know
Beginner-Intermediate
~10 miles round trip
2,150 feet
None required for day hiking. Adventure Pass ($5 parking fee) required. For backpacking permits, see the Cleveland National Forest Trabuco Ranger district
4 to 7 hours
Winter, early spring
State Route 74 is undergoing highway widening every-other-weekend in 2021 and 2022. Check to see if the construction will impact your ability to reach the trailhead
Take Ortega Oaks Highway (Highway 74) to the San Juan Loop Trailhead, 3.6 miles south of the El Cariso Visitor Information Center
5. San Gorgonio
San Gorgonio Peak (11,509 feet) wins the award for tallest mountain in Southern California and is one of the most topographically prominent in the entire U.S. Unsurprisingly, climbing San Gorgonio is a serious affair in any season and you can run into all kinds of weather.
I’ve encountered challenging snow and ice on the summit from November to June, while its steep climbs and exposed slopes can make going in summer a recipe for overheating and dehydration. For a fit hiker who has the proper skills and experience, San Gorgonio is arguably the best popular hike in Southern California.
Note that you can tailor your trip to the group’s abilities because there are plenty of scenic camping options at San Gorgonio Mountain which lets you break up how many miles you hike each day. However, while you have several trails to the summit, none of them are particularly easy and most have more than 4,000 feet of elevation gain. Also, as of Fall 2020, day hikers and backpackers need to have a permit from the San Gorgonio Wilderness Association and walk-up permits are no longer allowed, so you have to plan ahead!

My favorite route to the summit of Southern California’s tallest mountain
The trail I find myself returning to again and again is the South Fork Trail to the Sky High Trail. First, it passes a large mountain lake, a rarity in Southern California. Second, although the two trails combine for a longer route to the San Gorgonio summit, it’s less steep and has fewer switchbacks than many other paths (looking at you, Vivian Creek Trail). Before we get to those, though, be sure to get a permit prior to heading off for a day hike or backpacking trip!
Start at the South Fork Trailhead parking lot, making sure to display your Adventure Pass. Cross the road and follow a slightly eroded trail through Horse Meadow. Early in the season, you’ll hop over several wildflower surrounded streams. This area burned in the Lake Fire and is now exposed, which only seems to have made the wildflower growth better.
You’ll reach a viewpoint at the hilariously named Poopout Hill—which, if you’re feeling pooped now, just wait!—that looks across to Sugarloaf and other San Bernardino mountains. Then you’ll reach the signed San Gorgonio Wilderness boundary. This is where things start getting serious and the number of day hikers drop off.
After about 2 miles, you’ll reach a signed intersection. Although both trails eventually hit the summit, I prefer heading left towards Dry Lake. Not long after the intersection, my favorite place to take a lunch break is under the shady big trees near the springs feeding the South Fork of the Santa Ana River. It’s a great place to cool off before the next climb and top of water bottles (be sure to filter before drinking!).
Plenty of camping options
You’ve got a steady climb for the next 1.5 miles to Dry Lake. When you arrive, the reflection of the green peaks in the lake can take your breath away (but later in the season, as the name implies, it can dry up). This is also a stellar place to camp (there’s several designated camping areas, so be sure to indicate what part of Dry Lake you’re camping at when you make your permit reservation).
Even if you’re not camping here, the nearby Lodgepole Spring is a good place to top off water bottles. Unless you encounter snowmelt, there’s no water from here until the summit. The next 1.75 miles give you stunning views of San Gorgonio and the flanks of the nearby Jepson Peak. These north slopes can hold snow in early fall, winter, and late spring and are intimidating. You have another opportunity for camping just before reaching Mine Shaft Saddle.
Head sky high
At the intersection at the saddle, take the Sky High Trail straight, not the trail heading left. The Sky High Trail is my favorite route up San Gorgonio because you get to do a 270-degree walk around the mountain, much of it above treeline. This means you get to see views in all directions around the mountain. The eastern edge of the Sky High Trail feels remote and it stays that way until you’re almost at the summit.
The Sky High Trail starts with views down the valley into green North Fork Meadows and across at the burnt Ten Thousand Ridge range. You’ll traverse steep gullies that hold snow early and late into the season with long run outs below. For the skilled hiker or backpacker, it’s exhilarating (though admittedly for those less familiar with crossing snowfields, it can be terrifying). The trail switches back up the eastern face of San Gorgonio, passing the 1952 crash site of a C-47 plane. The map shows a memorial to the crash, but I always seem to miss it. The rubble from the crash is supposedly still on the mountain for those with keener eyes.
The trail turns to traverse the southern side of the San Gorgonio. The Sky High Trail hiker alone gets to look down towards a rare Socal Tarn (small high alpine pond) and at Bighorn Peak and the rugged Dragon’s Head. You’ll turn a corner and head north, keeping up the clockwise traverse. From here, you can see the Vivian Creek Trail across the way. The two trails intersect at a sign and continue together to the rocky summit. It’s nearly always windy and cold up here, so be sure to bring layers.
For a fit hiker who has the skills and experience climbing other SoCal Peaks, San Gorgonio is arguably the best popular peak in Southern California.


San Gorgonio - Good to Know
Advanced
~22.6 miles round trip
4,700 feet
As of Fall 2020, a free day use permit is required. You must make reservations in advance. No day of issue permits available
1 to 2 night overnight backpacking trip
Summer
As of Fall 2020, day hikers and backpackers need to have a permit for San Gorgonio and walk-up permits are no longer allowed. Be sure to get your free permit well beforehand. For backpackers, print out your California Campfire permit if you want to bring a backpacking stove (note: campfires are pretty much always banned here)
From Redlands, take CA-38 for 37 miles to Jenks Lake Road in Angelus Oaks. Follow Jenks Lake Road W for 2.6 miles. The South Fork trailhead is on your left.
6. Mount Baden-Powell
Mt. Baden-Powell (9,356’) is one of the tallest mountains in Southern California and to put it plainly, is a must-hike peak. For one, it has some of the best high-altitude wilderness vibes around and may even trick you into thinking you’re climbing the stacked mountain ranges of the Sierra Nevada!
I love this hike because the view is nothing but mountains—the Angeles Crest and San Gabriel range—for miles. And unlike other SoCal hikes, I’ve rarely been able to see suburban sprawl from the summit. Because this mountain is a bit out there, sometimes I’ll be asked, is Mt. Baden-Powell hard? At around 8 miles round-trip and under 3,000 feet of elevation gain, I like to say this is a prime intermediate hike.
Another highlight is getting up close and personal with the Wally Waldron tree, a 1,500 year old limber pine tree, which looks plunked down straight out of the J. R. R. Tolkien universe. These mountains are the ancestral home of the Tongva, Yuhaviatam/Maarenga’yam (Serrano), and Kizh people and it’s humbling to think of all the humans who have stood by this tree over the centuries.

Start in the subalpine
Start at the large parking lot at Vincent Gap (6,592 feet) on Highway 2, the Angeles Crest. You’ll pass a sign about ice and snow on this route. Take that warning seriously. As a north facing and shady trail, Baden-Powell’s switchbacks can be dangerous even when other trails have melted out. If it’s summer or you’re confident that snow is clear, follow signs up the well maintained Pacific Crest Trail (PCT). The PCT is graded to be accessible to horses, so it’s very steepest is just a 10% grade (10 feet rise for every 100 feet horizontal, or about 5.7 degrees). This climb is often well below that and gets kudos from hikers for its steady incline.
I love this hike because of the forest, full of Jeffrey, Ponderosa, Lodgepole pines, and eventually reaching white fir and the limber pine. The air is cool and often full of the call of the mountain chickadee, and the pines keep the trail shady, even during the summer. Because you start at a higher altitude so you often won’t get this kind of subalpine feel on other SoCal peaks until after you’ve climbed more than a mile.
You’ll make the grade to the top
After 1.7 miles at the 14th switchback, you’ll see a junction to Lamel Spring. Unless you’re a PCT hiker that needs the water, most people keep heading up more switchbacks through lovely forest. The climb becomes gentler for the next mile. There’s even a few small flat spots where you could take a break before your final push to the summit.
The last mile is a series of 19 short switchbacks. As you climb, the views of the surrounding mountains get better as the trees get shorter and more sparse. At the top, you’ll hit the ridge that’s home to the Wally Waldron tree. Nearby is the signed Mt. Baden-Powell PCT Junction, and you’ll leave the PCT here and in 0.3 mile and ~150 feet of elevation gain, you’ll find yourself on the wide, rounded summit of Baden-Powell.
From wood-lined creeks to subalpine fir forests and rocky alpine summits, there’s a Southern California ecosystem for all kinds of nature lovers. Sure, California is full of natural treasures, such as Big Sur’s coastal hiking trails, and of course Yosemite is on everyone’s hiking bucket list, but head up one of the peaks in this guide and you’ll see why the sprawling Greater Los Angeles metro area may actually be one of the most outdoorsy cities around—and one of California’s best hiking destinations.
Baden-Powell is one of the best hikes in the Southern California mountains, with Sierra-like feels.


Mount Baden-Powell - Good to Know
Intermediate
~7.8 miles round trip
~2,765 feet
None required for a day hike. Adventure Pass ($5 parking fee) required
4 to 8 hours
Early Summer
Wrightwood is a charming small mountain town, uncommon in SoCal. Grab a meal or beverage here!
Take the 15 east to Cajon Pass, taking exit 131 for CA-138. Take 138 for 8.6 miles and at the light, follow signs west towards Wrightwood by turning left onto Angeles Crest (CA-2). Continue for 5 miles to Wrightwood and pass through town, continuing on Highway 2 for another 9 miles until you reach Vincent Gap. Alternatively, for a more scenic but twistier mountain drive, take the Angeles Crest Highway (Highway 2) from La Canada Flintridge for about 50 miles. Note that Highway 2 is seasonally closed in the winter, for wildfire season, or if landslides or debris fall onto the road. Always check before you go