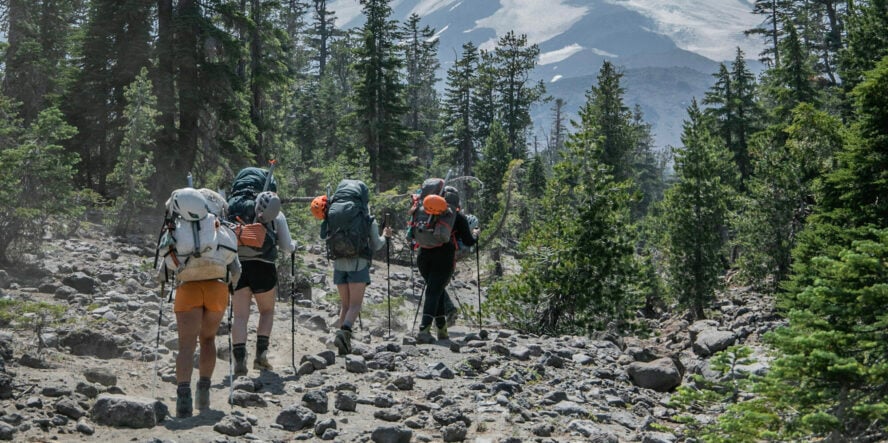

The snow crunched under my crampons as we crested the summit dome of Mount Baker. We were bundled against the cold, the morning sun casting first rays over the seemingly endless sea of peaks.
Of all the routes into the sport, a climb of Mt. Baker may be one of the best forays into mountaineering in the U.S. due to its accessibility and options of mild mountaineering terrain. That’s why I chose it as the first big mountain experience for my partners—and collectively, we couldn’t be happier for the summit we shared.
Around us, other rope teams celebrated as we were, they drank water and feasted on snacks like we all were pleased to do.
The big difference: we were a group of all women climbers, led by women guides on a trip run by an all-women company, something that is extremely rare to find in the outdoor industry. That day was another example of how special Mount Baker is as a stepping stone into the world of mountaineering, but also a reminder that there is so much more to be done: so many mountains to climb, and so many barriers to break.
Mount Baker is just the beginning.

Pros and Cons of Climbing Mount Baker
Climb Mt. Baker 101: A Mountaineer’s Introduction
It’s hard to find a better place in the U.S. for an intro to mountaineering.
At 10,781 ft (3,286 m) in elevation, Mt. Baker is the second most glaciated peak in Washington, only behind the much taller and comparatively more challenging Mt. Rainier. Unlike most glaciated terrain in the U.S., which is rapidly deteriorating from climate change, Baker’s glacial coverage—while shrinking—is staying relatively intact because of the heavy snowfall it receives each year. In fact, it is one of the snowiest places on earth.
Given how remote-feeling and undeveloped the area is, you might be surprised that the peak and the greater Mt. Baker-Snoqualmie National Forest is only about two hours north of Seattle. The boundaries of the park house more glaciers and snow fields than any other national forest outside Alaska. In other words, part of its charm and attraction is the easy access to wilderness.
What makes Mt. Baker such a beginner-friendly climb?
Offering heavily glaciated terrain not far from the parking lot, Baker has the feel of a big mountain objective. Most routes involve over 7,000’ of elevation gain, with relatively easy access.
On the mountain, camping areas are abundant, which can accommodate ample climbing parties. There is also plenty of ground to practice fundamental mountaineering skills, such as crampon technique, crevasse rescue, and building snow anchors.
The beginner routes on Mount Baker (Coleman-Deming and the Easton Glacier) can be done in just two days, but most programs run for three in order to give climbers a taste for the logistics, time, and effort of big mountain trips.

A Bit of History
Mount Baker was first known as Komo Kulshan by the Lummi and Nooksack tribes which means the “Great White Watcher.” Komo Kulshan feeds the rivers that give way to salmon which the native tribes saw as a source of food and life.
The name “Komo Kulshan” was eventually superseded in 1792, renamed by Captain George Vancouver after his lieutenant, Joseph Baker, who spied the mountain in the distance while on an expedition in the Strait of Juan de Fuca. Six years later the official story of their voyage was published, including the first printed reference of the mountain as “Mount Baker”.
The mountain itself wasn’t climbed until nearly a century later when Edmund Thomas Coleman (of which the Coleman glacier is named) made the first attempt to reach the summit in 1866. Back then, an expedition to climb the mountain was a two-week affair, and it took three expeditions until Coleman, and a team of three others, reached the true summit of the volcano—the beginning of a long and continuous history of mountaineering on the mountain.
Today, people from all over the world flock to the mountain and the 1,500 miles of trails throughout the Mount Baker-Snoqualmie National Forest, the ancestral lands of the Upper Skagit Tribe, Nooksack Tribe, Samish Tribe, Stillaguamish Tribe, Sauk-Suiattle Tribe.

Finding My Calling in the Mountains
The first four thousand meter peak I ever climbed was with my parents in the Alps, called Breithorn—something I would now consider the easiest of the 4,000s. I vividly remember being on the 200-meter glacier section and feeling totally out of place, realizing that I had no business being there without the proper knowledge.
This initial experience taught me the importance of going with a guide and of developing the skills necessary for glacier travel and heading into high risk terrain. Even on mountains with easy access, such as Mount Baker (or Breithorn, for that matter), highly consequential accidents can occur and you or your guide needs to know how to respond in order to stay safe.
As I became more involved in the mountaineering world, I noticed marked bias against the few women that were getting after it in the high-elevation realm. Feats that women, myself included, would attempt were looked at through a different lens than if a man was to be doing the same thing. That’s why starting AWExpeditions, which partners with professional women guides and creates a space for more women to start their mountaineering journey in a safe way, is so important to me.
If you’re interested in a women-only climb up Mount Baker, reach out!
Three Beginner-Friendly Climbs of Mount Baker
When I think of the Mt. Baker climb, the word “magic” always seems to come to mind. The feeling of being out there on the glacier, accepting that there will be moments of uncertainty, of pushing your limits, and developing skills to be able to challenge your comfort zone is pure magic to me.
As you continue your own path into this elevated domain, consider some of these popular routes on Mount Baker to help you develop your skills:
-
- Coleman-Deming — 11.8 miles, 7,300 feet, best for the classic climb up Mt. Baker
- Easton Glacier — 12.5 miles, 7,500 feet, best for a late-season beginner climb
- North Ridge — 6 miles, 7,300 feet, best for a step up in difficulty
Coleman-Deming
Fast Facts:
-
- Distance: 11.8 miles (19 km) round trip from the trailhead to the summit
- Elevation gain: 7,300 feet (2,225 m) of elevation gain from trailhead to summit
- Difficulty: Beginner
- Duration: 8-10 hours round trip from camp to summit (2 days recommended)
Map of the Coleman-Deming route

Climbing the Coleman-Deming route of Mount Baker
Coleman-Deming is the standard route, and the most popular multi-day alpine climb on Mt. Baker. You’ll tackle the north face and encounter beautiful views of the towering Black Buttes and the North Cascades peaks in the distance. It’s a beginner mountaineering route meaning that there is no steep technical climbing, but high physical fitness and glacier skills are necessary to complete the route safely.
The trail to the Coleman-Deming starts at the Heliotrope Ridge trailhead located at around 3,700 ft. Things start out mildly, then after passing Kulshan Creek and two waterfalls you come to a fork in the road where you must follow the path to the right and up, and up.
Out of the trees, you ascend through alpine meadows and eventually onto a moraine path that you follow until reaching the base of the Coleman Glacier at around 6,000 ft. Right below the glacier is the most popular camping spot, Hogsback Camp—in earlier months of the season it is a flat area for snow camping, but which in later months tends to melt out to dirt and rock.

From camp you walk almost directly onto the glacier ascending easy snow with the Heliotrope Ridge to climbers right. Depending on the time of year, this can be a relatively straight shot or, as is often the case later in the season, a maze of crevasses.
As you pass under the magnificent Black Buttes, move swiftly and with caution as the peaks are infamous for falling seracs and rocks. After passing under Colfax Peak (the Black Butte closest to the route) you begin to turn slightly to the right aiming for the Colfax-Baker Saddle that sits at around 9,000 ft. Reaching the saddle you can look down onto the Easton Glacier as you round the corner to ascend the ridge—the Coleman Glacier now to your right and the Deming on your left.
At the end of the ridge you will get to the base of the Roman Headwall, named for a rock outcropping on the side that is said to look like “a Roman nose.” Not actually a wall, it is rather a steep ramp that in some places can have up to a 40-degree slope angle. However, the switchbacks on this section make it feel less steep than it is.
After topping out on the Roman Wall you reach the summit ridge that is more like a summit football field. A large snowfield takes up most of the space at the top, and you have to continue to the far northeast corner for the true summit: a small dome at 10,784 ft.
How to get there:
From Seattle, it takes about two and half hours to reach the Heliotrope Ridge Trailhead parking lot by car. Take Interstate 5 North for about 70 miles until exit 236 for Bow Hill road. After about 9 miles turn left onto WA 9 N towards the town of Glacier. From Glacier, turn right onto Glacier Creek Road/NF-39 and follow this road for about 8 miles. The Heliotrope Ridge lot will be on your left.
Easton Glacier
Fast Facts:
-
- Distance: 12.5 miles (20.1 km) round trip from trailhead to summit
- Elevation gain: 7,500 feet (2,286 m) from trailhead to summit
- Difficulty: Beginner
- Duration: 8-10 hours round trip from camp to summit (2+ days recommended)
Map of the Easton Glacier route
The Easton Glacier route starts on the south side of Mount Baker and follows a moderate grade to the glacier. Stay to the right of the Roman Wall on steep snow, on to the summit plateau. The summit is on the far east-northeast side. Interactive Map from FATMAP
Climbing the Easton Glacier route of Mount Baker
Located on the south face of the mountain, the Easton Glacier is most popular during the later months of the summer when the Coleman-Deming is no longer passable due to large crevasses that open up. The Easton Glacier route is a beautiful straight up-and-back (in good mountain conditions) and well suited for entry-level mountaineers.
However, this should not to be taken lightly; one should have the proper glacial skills and knowledge or hire a guide. If you’re new to mountaineering, consider taking an introductory mountaineering skills seminar on Mount Baker to develop your base, and apply your acquired fundamentals towards a summit push.
The trailhead to the route starts at the Park Butte parking lot which sits at about 2,800 ft. Weave through tall fir and pine trees before reaching a creek crossing that in earlier months of the season—as the snow melts and before the National Forest service puts in a small bridge—can be the crux of the hike up to high camp. At times, it could be necessary to take off your boots and wade through the creek or find a safe log to cross on.
From the creek crossing, the trail winds up about 2,000 ft of elevation before hitting the section of the trail known as the Railroad Grade. Here you follow a ridge along a moraine taking one straight to the base of the Easton Glacier climbing route.

Just before reaching the edge of the glacier, the ridge widens and flattens out into a big rocky and sandy area known as Sandy Camp, where most climbers set down for the night. The camp sits at about 5,600 ft and is a little over 3.5 miles from the parking lot. Depending on the season, Sandy Camp can be on dirt or on snow.
From the base of the glacier it’s about 4,800 ft of elevation gain to the summit of Mt. Baker. On average, it takes about six hours up and 3-4 back down. Depending on the time of year, the glacier can look like one large snowfield or it can be spotted with crevasses and snow bridges making for a bit more of an exciting climb as you weave between cracks in the mountain, ominously staring down into them.
A great stop along the way is at the Sherman Crater that sits high up on the mountain at around 9,619 ft. From the edge you can stare into the volcano’s crater that is often emitting sulphuric vapor.
From the crater it’s only an hour or so more to the summit and a little over 1,000 feet of elevation gain up the Roman Headwall making it the steepest part of the route. From here, it follows the Coleman-Deming route outlined above—climb up and over the Roman Wall to reach the summit dome located at the far northeast side of the summit plateau.

How to get there:
Driving from Seattle the Park Butte trailhead is only about two hours by car. Leaving Seattle, take Interstate 5 North for about 67 miles to Cook road off of exit 232 towards the small town of Sedro-Woolley. From Sedro-Woolley, continue on Cook Road until it turns into State Route 20 E. Follow Route 20 For about 16 miles until turning left onto Baker Lake Road which you will follow for 12 miles until turning left onto a gravel forest service road NF-12. Follow the curvy forest service road turning onto NF-13 after about 3.5 miles. This will take you right to the parking lot of Park Butte where the trail to the Easton Glacier begins as well.
North Ridge
Fast Facts:
-
- Distance: 16 miles (25.7 km) round trip from trailhead to summit
- Elevation gain: 7,300 feet (2,225 m) from camp to summit
- Difficulty: Moderate ice climb
- Duration: 10-12 hours round trip from camp to summit (recommend 2+ days)
Map of the North Ridge route

Climbing the North Ridge route of Mount Baker
The North Ridge is the most difficult of the three routes, listed as a moderately technical alpine climb. However, depending on the conditions the difficulty can vary, from steep snow in the early season to steep ice later on. Do not attempt this route without in-depth knowledge of alpine climbing.
This route requires two technical ice axes, snow pickets and at least six ice screws as well as very physically fit climbers. Parts of the route can be 80-degrees steep and due to its technicality, climbers often find themselves on the route for 10-12 hours.
The trailhead for the North Ridge starts at the Heliotrope Ridge (the same as the Coleman-Deming route) following the same instructions to get to the Hogsback Camp. There, you can decide to spend the night or push a bit higher onto the Coleman Glacier and camp at a relatively flat spot around 6,500 ft.

From the 6,500-foot Coleman Glacier camp, cut left and head towards the base of the prominent North Ridge. Depending on the time of year there might be a straight path to the base or you may find yourself having to navigate many crevasses.
Once at the base of the North Ridge there is one prominent and steep ice gully—enter from the right but be wary of the rockfall. This side of the mountain usually stays cold until around 11am since it’s to the west, but it is still advised to enter the gully as early as possible to avoid rock and ice fall. In the early season, this gully could be all snow, however as the summer continues at least the upper portion turns to ice.
Through the gully you will find yourself at the base of an ice cliff. Head slightly left and you will find a good place to set up a belay and pitch out the 40-45 degree ice wall. At the top you will gain the North Ridge proper where, depending on the conditions, you can pitch out the rest of the climb or simul climb the upper glacier all the way to the summit plateau.
From the base of the summit plateau, work your way around the seracs and crevasses to reach the true summit. On your way down, take the normal Coleman-Deming route to return back to camp.
How to get there:
Same as Coleman-Deming route: From Seattle, it takes about two and half hours to reach the Heliotrope Ridge Trailhead parking lot by car. Take Interstate 5 North for about 70 miles until exit 236 for Bow Hill road. After about 9 miles turn left onto WA 9 N towards the town of Glacier. From Glacier, turn right onto Glacier Creek Road/NF-39 and follow this road for about 8 miles. The Heliotrope Ridge lot will be on your left.
Additional Information To Know Before Your Mt. Baker Climb
Gear & Equipment
All three routes require basic mountaineering equipment (crampons, Ice axe, rope, helmet, carabiners, harness, pickets, crevasses rescue kit) but the North Ridge requires additional gear such as ice screws and technical ice tools.
If you go on a guided adventure to climb Mount Baker, group camping equipment will be provided by the guiding service. With that, here’s a list of the suggested equipment to bring:
-
- Backpack large enough to carry all the items listed (around a 65L bag)
- Glacier glasses and ski goggles
- Four-season sleeping bag
- Sleeping pad and liner
- Compression sack for sleeping bag
- Crampons
- Ice axe
- Water bottle
- Food you can eat on-the-go (energy bars, electrolytes, sports drinks)
- Toiletries (sunscreen, bug spray, toilet paper, chapstick with SPF, etc.)
- 100% UV Sunglasses
- Headlamp
- Extra batteries
- Camera — optional
Here’s a list of clothes I suggest you bring:
-
- Insulated mountaineering boots that work with crampons
- Training boots for camp
- Thick wool socks and thin trekking socks
- Gloves (lightweight liner gloves, softshell gloves, insulated mittens)
- Expedition-weight insulated puffy jacket
- Hardshell (GoreTex) wind-and-waterproof shell jacket
- Softshell jacket
- Warm mid-layer top & long-sleeve hoodie
- Short or long-sleeved base layer top
- Softshell pants & hardshell (GoreTex) pants
- Fast-drying base layer bottom (no cotton)
- Underwear
- Neck gaiter
- Buff, sun hat, and beanie
- Set of town clothes
- Light towel
You will need clothes for hiking during the day, resting in the evening, and for sleeping. Dress comfortably, for the weather and season. Your clothing should be lightweight, breathable, hand-washable, and quick-drying, which means no cotton.
Summer avalanches
Avalanches are more prominent in pre-season and early season (before May), however that doesn’t mean they can’t happen at other times. If you don’t have knowledge about how to read snowpacks and manage backcountry risk, make sure to go with a guided service.
How much does a climb of Mount Baker cost?
The cost of a trip can vary depending on the length of the program you decide on. If you choose to go on a 5-day women-only climb of Mt. Baker with AWExpedtions, which includes two nights of lodging in Seattle and a group transfer to and from the trailhead, the rate is $2,195.

Why do your Mount Baker climb with a guide?
If you are planning to attempt the Mt. Baker climb, I would highly recommend you go with a guide unless you have sufficient experience on glaciated terrain and crevasse rescue proficiency.
Just because it is easy to get to and has many beginner mountaineering routes doesn’t mean accidents don’t happen. It’s a great mountain to learn new skills or to practice ones you have already developed, but make sure that you can navigate any situation you might encounter up there before venturing on your own.
Training for a climb of Mt. Baker
This can vary for all climbers, but I usually say you should be able to complete a trail half-marathon or be able to hike 13-15 miles with a 40 pound pack on your back and not feel entirely worn out at the end of the day. If you are looking for a structured training program, Uphill Athlete or Evoke Endurance offer plans for mountaineering and climbing.
Permits for climbing Mt. Baker
One of the great things about climbing Mt. Baker in Washington is that since it is in a national forest, and not in a national park, the permitting process is easier. All you need in order to recreate in Mt. Baker-Snoqualmie National Forest is a Northwest Forest Pass or a National Parks Pass to park at the trailhead, and there is a Voluntary Climbing Register that is helpful to fill out.
This makes Mt. Baker more accessible than other mountains with a permit lottery, but it also means that camping areas can get crowded. If you have additional questions, stop by the National Park Service building located in Sedro-Woolley right on Cook Road.
Water Sources
On all the routes, water can either be melted from the snow and ice on the glacier, or in the later months, collected from the rivers and creeks alongside the approach trails. Just make sure to use a filter before drinking!
Mount Baker Climbing Conditions
The conditions on the mountain vary a lot depending on the season. Most of the fall, winter and part of spring, the mountain isn’t very safe to climb due to the amount of snowfall the mountain receives and thus, heightened avalanche danger.
Spring: In April and May, things start to warm up, creating less risk for avalanches (although not totally rid of the risk), crevasses tend to remain covered, and snow bridges are solid, making for more secure conditions. Oftentimes, you will have to do lots of post-holding if you are breaking trail. Come June, the mountain is melting out: the approach trail begins to clear, creek crossings get more dangerous, and a few of the biggest crevasses begin to open up.
Summer: In July, August and September the approach trail and camping areas tend to be all melted out and the glaciers much more exposed. The winter’s snowfall and how hot it’s been will impact how many crevasses open (and how big), the stability of snow bridges, etc. If it’s been a really hot summer, by the end of August the mountain can even look “chopped up” with open crevasses; the route often has to weave through the cracks to make it to the top.
The best time to climb Mt. Baker
The best time to climb Mt. Baker is from May-September. Generally, May and June are considered early-season with a lot more snow and potential avalanche risk. July and August are peak season, where the approach and camping is often on dirt. The mountain can still have some snow on it, but conditions could also be down to glacier ice and open crevasses.
September is often considered late-season, which means that the approach and camping is still on dirt and the glacier is the most exposed it will be all season. However, temperatures typically start dropping, making it cooler. Further, wildfires often occur in September which can affect the air quality on the mountain.

A Path Forward
On that crisp August morning on Mount Baker I look around once more at the teams surrounding me. I hope that one day there is no longer a need for a woman’s only company in the climbing world, and I do see the change happening. Slowly.
For now, just like in mountaineering, I’ll keep putting one foot in front of the other and work towards my goal, just as you will, in your own mountain journey.