
When I think of alpine hiking trails in the Canadian Rockies, certain words come to mind: Iconic, timeless, possibly verging on the surreal. These trails are so awe inspiring, so breathtaking, that they must be savoured like fine scotch. I have walked along all these trails and gazed up precipitous rock faces, swam in many azure blue lakes and watched stunning sunsets. With dozens, if not hundreds of incredible hikes to choose from, it’s hard to narrow down the top ones. And, while any hike in this area can easily be labelled worthy of a bucket-list, here are five of the best hikes in the Canadian Rockies.
Rightfully deserving a place amongst the best hiking destinations in the world, Canada’s Rocky Mountains run along the border of British Columbia and Alberta. If you combine the square footage of Banff National Park, Yoho National Park and Kootenay National Park, it’s over 9,300 square kilometers (3,500 square miles), which is truly astronomical and hard to comprehend. If these three combined areas were a country, it would be the 33rd smallest country in the world. The biggest takeaway is that this is a massive amount of land and you will experience true wilderness while hiking these trails. Despite the sheer vastness of this area, if it’s a shorter, more popular hike, prepare to be surrounded by like minded tourists, especially during high season.
Don’t feel daunted by the organization required to plan a hike in the Rockies, because trust me, it’s so worth it. In fact, you can opt for a guided tour and leave the logistics up to the guides. These are all bucket list hikes that will leave you fulfilled and dreaming of more. There isn’t just one way to tackle the multi-day hikes on this list. I’ve run some of these trails in one shot, and know other people who have spent a week enjoying the backcountry sights.

The distances between campsites have been laid out for each hike so that you can decide what suits you best, it all depends on starting times, the skill level of your group and how much effort you’re willing to put in per day.
Well, without further ado, let’s get into the hikes I have decided to highlight. I consider these to be some of the best hikes in the Canadian Rockies and I chose to highlight them because they are special, but there are many other options and I hope that these simply tease you to begin your wanderings through these incredible national and provincial parks.
1. Rockwall Trail in Kootenay National Park
Rockwall Trail is a multi-day hike near Lake Louise that absolutely blew my mind. At 58 kilometers (36 miles), this hiking trail has 2743 meters (9000 feet) of elevation gain. It runs through three passes and follows a single, massive limestone cliff. It took awhile to access the alpine, but once we did it was an incredible experience. The Rockwall is so named because for a vast majority of the hike you are underneath a massively steep rockwall. Hours of your hike can be lost tracking the waterfalls as they cascade off this limestone cliff and crash down to the valley you are walking in.

The Rockwall is unique in that its trailheads, the Floe Lake Trailhead and the Point Pots Trailhead, are 6.2 miles (10 km) apart so it’s easy enough to sort out the car shuttle. Mentally, it’s best to organize your car shuttle at the start of the trip so that you are heading towards your car, and not arriving late, sweaty and trying to hitchhike. Having a bike stashed can also work well. You can be friendly with other hikers and maybe they are doing it the reverse way and need to drop a car at the opposite end.
Which direction should you hike the Rockwall Trail?
It can be hiked in either direction, from Paint Pots Trailhead to Floe Lake Trailhead or the other way around. The real challenge is to figure out which direction you want to hike in. If you start at the Floe Trailhead, you will end up hiking on the solar side, which makes it hotter, drier and more challenging in my opinion. Yet, it seems like the majority of people do it from south to north so there must be some reasoning I am missing. For me, I like hiking north to south because the section is hiking deep into the mountains with little vertical and more distance. Since your bag is at its heaviest on the first day of hiking, it’s nice to not have a huge gruelling ascent to start the trip off with. I also believe that the Floe Lake has the best campsite, which is best saved for last, leaving a nice descent on the way to your car
Although it is called the Rockwall Trail, it isn’t just the Rockwall Trail; it’s a combination of a few different trails. This helps if you only want to do some of this mega trip, since these offshoot trails give escape options. It is composed of the Ochre Creek Trail, Helmet Creek Trail, Rockwall Pass Trail, Wolverine Pass Trail, Tumbling Pass Trail, Numa Pass Trail, and Floe Lake Trail.
For reference, here are the distances between trailheads and campgrounds on this hike: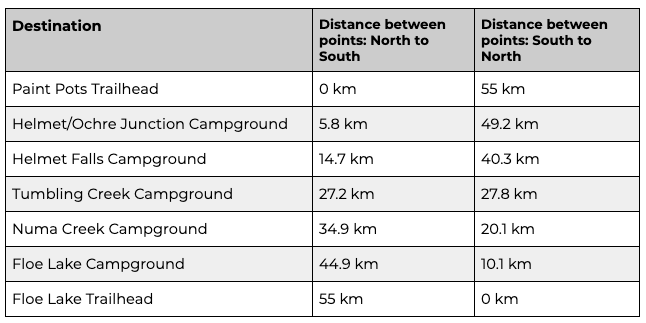
The majority of people do this hike in three nights and four days, but this really depends on your objective. Don’t forget that vertical really adds to the challenge and this one packs it in. When planning, I usually set a benchmark of about 3km/hour and also 300 meters of elevation gain per hour.
Camping in Kootenay National Park
Kootenay National Park campgrounds are open from mid-May to early October. All campsites along this trail have access to bear lockers, non drinking water, outhouses, tent pads and cooking areas. Reservations are mandatory, andLike most campsites in the Rockies, reservations are pretty sought after so I recommend booking as early as possible, especially if you plan to hike during peak season. You can find more information on campground reservations here.
This hiking trail is by far the largest undertaking in this list and one that should not be taken lightly. There is an exit at Numa Creek that would allow you to sneak out if you realize that you have bitten off more than you can… hike?
The Rockwall Trail has it all — incredible lakes, massive waterfalls, larch forests, endless uphills and will satisfy anyone up for the challenge.


Rockwall Trail in Kootenay National Park - Good to Know
58 kilometers (36 miles)
2700 meters (9000 feet) of elevation gain
Challenging intermediate to difficult
1-5 days
Forest and mountains — a quintessential Rockies hike!
Late June to late September
Download the free Kootenay National Park Visitor Guide from Parks Canada
This Rockwall Trail map is specifically designed for hiking. It’s waterproof with loads of additional information.
2. Iceline Trail in Yoho National Park
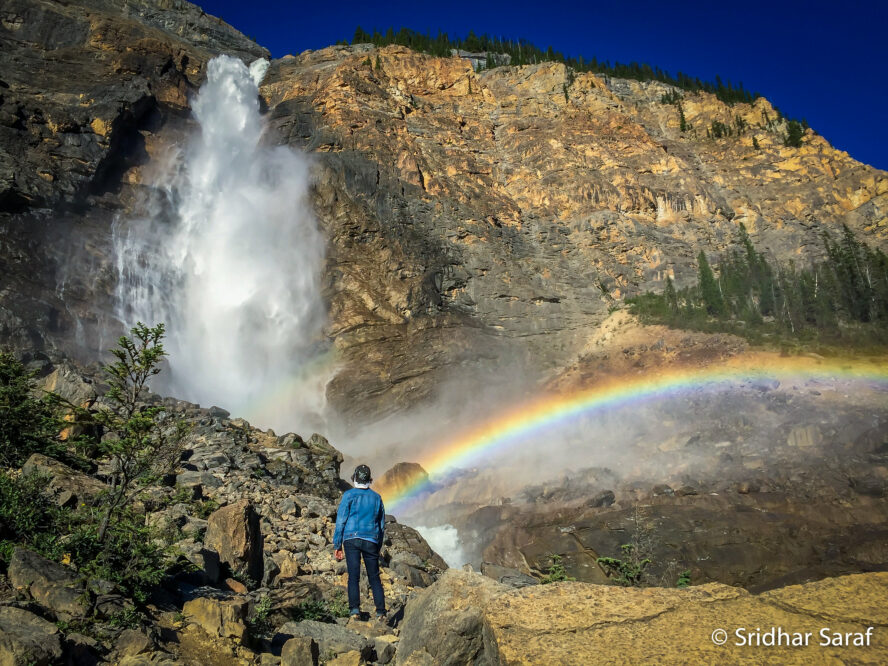
The Iceline Trail is the best intro to backpacking in the Canadian Rockies. Start this hike at Canada’s second highest waterfall, Takakkaw Falls, which cascades in the background for the most of the hike. While being much shorter than most of these hikes at 21 kilometers (13 miles), this one really packs it in. It’s the perfect option for a day-long tour. Once you gain the alpine, the terrain feels really raw and the glacial recession is very recent.
Camp, hostel or hut — the choice is yours
There are a few campsites along this hike, and it all depends on how you want to execute it. You can hike to Laughing Falls, and Little Yoho where you can camp at both. I would suggest hiking to Little Yoho, which sets you up for the ascent into the alpine the next morning. You can also camp at the Takakkaw Falls Campground at the trailhead or the Whiskey Jack Wilderness Hostel. It is also possible to book your night at the Alpine Club of Canada’s Stanley Mitchell Hut and remove all the camping weight from your bag. This is a great option, and the hut is quaint and beautiful, resonating with the history of the area.
For reference, here are the distances between trailheads and campgrounds on this hike: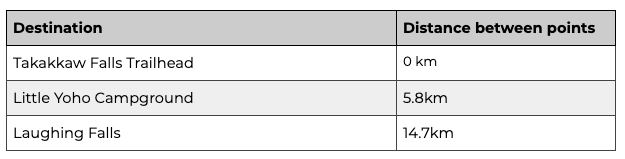
Which way should you hike the Iceline Trail?
The Iceline Trail is typically done in one to two days. There are benefits to both and I will let you decide, yet, if I were doing it in a day, I would hike it clockwise, which gets rid of the vertical right away. If I was doing it over two days, I would hike counterclockwise, saving the best for the second day and easing into the uphill hiking with lighter bags. There is a shorter loop option of 17 kilometers (10.5 miles) by taking the Celeste Lake Trail back down.
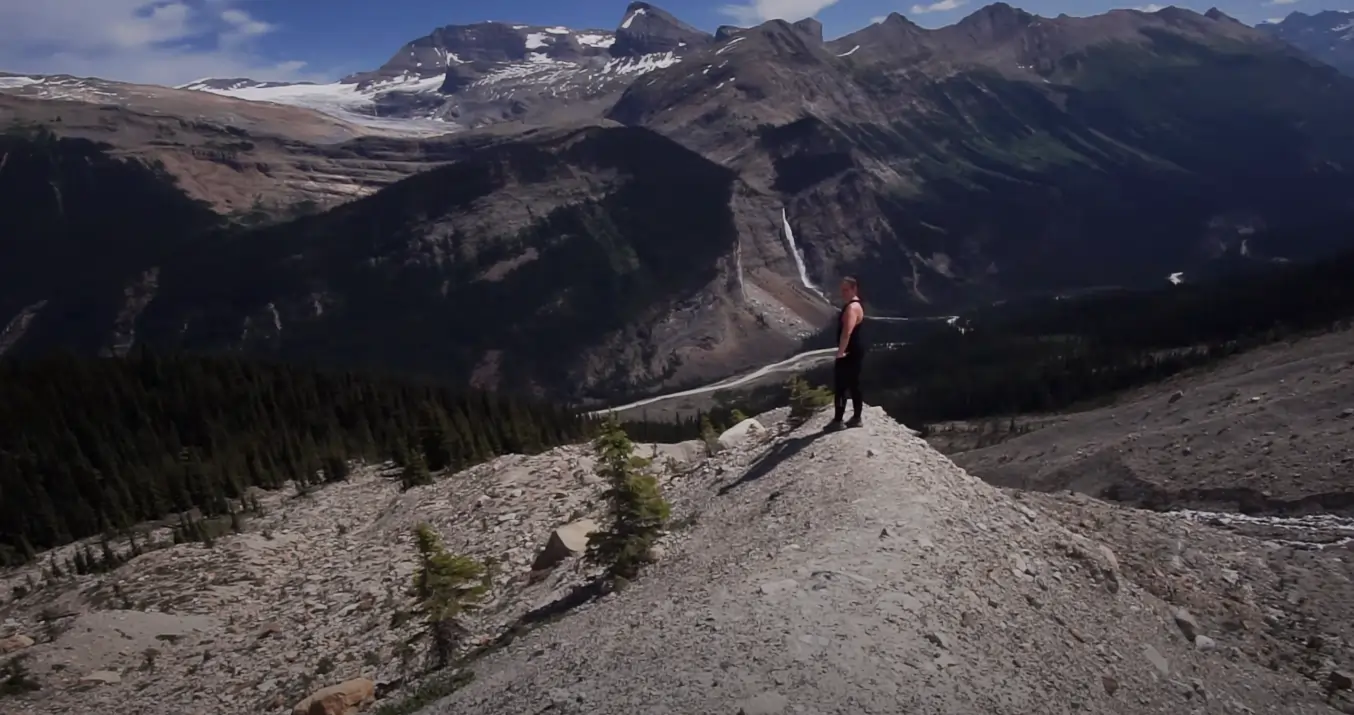
There is an absolutely iconic moraine that was the highlight of the trail for me. Narrow and perched up in the alpine, you can sit on top and almost watch the emerald glacier recede. The trail is immaculate and courses over rock slabs and through creeks, winding through terrain similar to what the rover Perseverance is seeing on Mars. You can almost feel time carving this landscape and when comparing older maps to the present, the recession of these glaciers is very recent.
The trail is immaculate and courses over rock slabs and through creeks, winding through terrain similar to what the rover Perseverance is seeing on Mars.


Iceline Trail in Yoho National Park - Good to Know
21 kilometers (13 miles)
700 meters (2330 feet) of elevation gain
Moderate
1-2 days
Alpine, treeline
Late June to late September
Download your Yoho National Park Trail Map from Parks Canada
3. Skyline Trail in Jasper National Park
The Skyline Trail is the highest trail in Jasper National Park and will not disappoint. A little longer than a marathon, 45 kilometers or 28 miles, this trail is built for hiking, easy grades, stunning vistas, and its signature “Skyline” ridge at over 2400 meters (8000 feet). This epic hike is done in many different ways. Some people run it in a day, as it is almost a perfect mountain marathon! Others hike it in two days with light backpacks and stay at the Shovel Pass Lodge midway. I believe most people do it in three to four days to take in all the beauty this trail has to offer.
How long does it take to hike Skyline Trail?
The Skyline Trail is 45 kilometers (28 miles) and most people hike it in two to four days. Typically, people start at Maligne Lake and begin walking towards Jasper. The first 7.5 kilometers (4.6 miles) are a casual grade through forest, with hints of the incredible alpine. You pass by Evelyn Creek Campground at around 4.8 kms, which would be a good campground if you plan on starting later in the day.
Little Shovel Campground is a quieter camp spot than Snowbowl and is appreciated by those seeking less people. It hosts great views of Maligne Lake and the Bald Hills.
A gruelling — but rewarding — hike through Jasper National Park
Once you pass Evelyn Creek, things start to go up from there. You’ll be up and into the alpine for the next 25 kilometers (15 miles)! Wide open bowls filled with alpine flowers led to Big Shovel Pass, and from there the trail changed temperament to a narrow perfect path, cutting its way across scree slopes, through boulder fields, and past Curator Lake.
This next section is the steepest and most notorious section of the trail. First, you have to hike the steep switchbacks up to the Notch, which brings you through to the signature section of the trail. An incredible single track that walks the skyline ridge with views in all directions. Savour these steps and wind your way towards Mount Tekarra, but beware of changing weather as this is the most exposed section of the trail.
The wind down under the castle-like towers of Mount Tekarra and onwards to Signal Mountain and the final gruelling nine-kilometer hike down to your car. You’ll finish this hike exhausted but possibly more rewarded than you’ve ever been outdoors.
For reference, here are the distances between trailheads and campgrounds on this hike: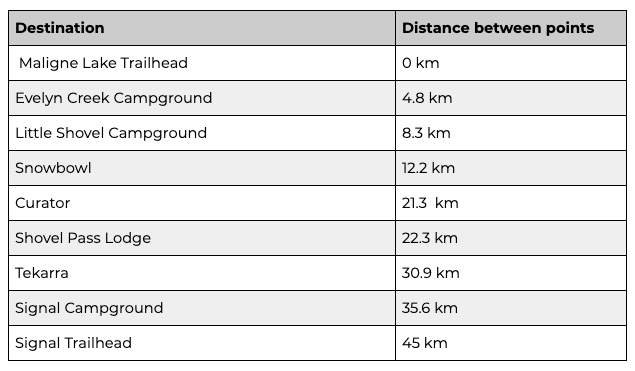
If I had to pick just one hike off this list, I would choose this one as the must-do. It has so much variety and beauty packed into its 44 kilometers that you are sure to be satisfied.


Skyline Trail in Jasper National Park - Good to Know
45 kilometers (25 miles)
1400 meters (4600 feet) of elevation gain
Challenging
2-4 days
Forest and mountains with a good portion above treeline
Late June to late September
Parks Canada’s Backcountry Guide to the Skyline Trail
Spend a night at Shovel Pass Backcountry Lodge
4. Berg Lake Trail in Mount Robson Provincial Park
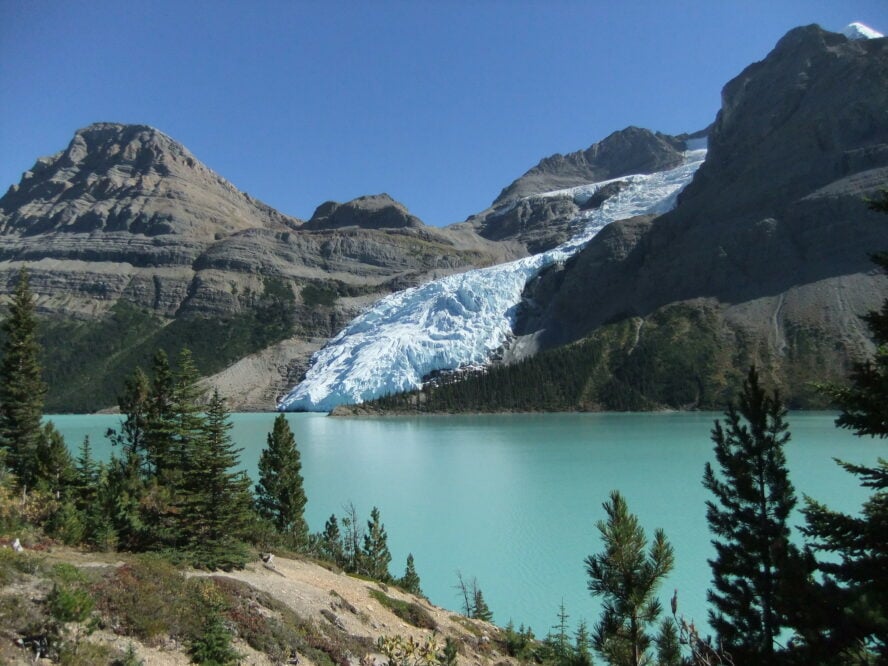
The Berg Lake Trail is one of the most popular hiking trails in the Rockies. If you’ve ever seen pictures of Mount Robson — Canada’s highest mountain at 3,953 meters (12,972 feet) — you will understand just how captivating it is. Berg Lake Trail is an incredible hike overshadowed by the presence of this beautiful mountain. By overshadowed, I do not mean that you’re in the dark the whole time, more that your eyes and energies are constantly drawn to the ridges, glaciers and summit of this mountain.
This is a beauty of a hike with a singular destination, Berg Lake, a stunning turquoise lake sitting below north facing glaciers. These glaciers are constantly caving off into the lake and these small icebergs float lazily around. Can you swim in Berg Lake? Yes! After the 20-kilometer hike in, Berg Lake is waiting for you the whole time, ready for you to plunge into its icy depths to replenish your energy.
How long does it take to hike the Berg Lake Trail?
Drive 87 kilometers (54 miles) west of Jasper to reach the trailhead for this out-and-back hike. From there, it’s 42 kilometers (26 miles) of hiking with 730 meters (2400 feet) of elevation gain through pristine Canadian wilderness. Depending on your goals, it takes people one to five days to complete this trail. This is a popular route, so prepare to see other hikers along the way, but since camping must be reserved, there is a cap to the number of people you’ll encounter along the way.
None of the other hikes in the list are out-and-back hikes because I typically prefer loops. I love the idea of seeing new terrain the whole time, yet this one is well worth it. All the uphill vertical is done on the way in, making the way out much less daunting. Obviously, there are a couple of smaller hills but nothing soul crushing! Having Berg Lake as the destination gives the hike in a singular focus that makes the way in easier on the mind. And, the resplendence of Mount Robson will keep you enthralled the whole hike and truly makes this a special trail. If you have time, there are plenty of days hikes to do while camped at Berg Lake.
Biking the first section is an option
Another thing that might draw in some adventurers is that the first 7 kilometers to Kinney Lake can be biked. This can be a blessing, but maybe it’s also a curse because how do you set your bike up to make it easy to bike with three to five days worth of camping supplies? But, if you do, you can e-bike it also, so perhaps a trailer towing behind an electric bike would facilitate the first and last 7 kilometers!I have always biked this first stretch, and the struggle was worth it knowing that there was a bike waiting for me on the way home.
Camping along Berg Lake Trail
There are seven places to camp along this trail. Each campground has a handful of tent pads, and each tent pad will hold a single tent up to 10’ x 10’ and 1 to 6 people (all ages) per pad.You must reserve your campsite in advance since there are no first come first served campsites. To book your campsites, head over to the BC Parks website for all the details you need.
The camping policies for BC Parks look a little different in 2021. BC residents have priority access to reservations for the entire summer, and these can be made starting March 8th and can be booked up to two months in advance on a rolling basis. For those coming from out of province, reservations start July 8 for the rest of the year but make sure that you check the website before planning any trip as policies may be updated.
Here is a list of the campsites and the distance to the trailhead: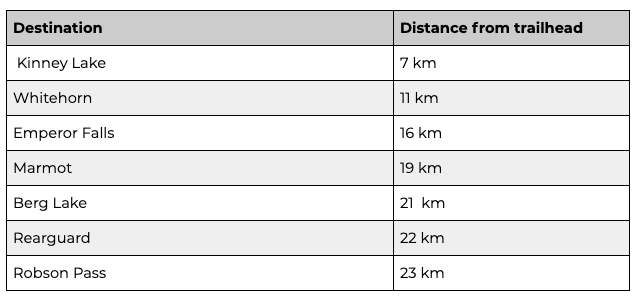
As you can see from the site selection, you must plan your hiking trip well in advance. I would say that the Kinney Lake campsite is a must, and then it really depends on what you want. Emperor Falls is beautiful, yet there are only four sites so it’s a little harder to reserve. However, it is a really nice respite part way up the biggest vertical of the entire hike.
The cascading and crashing glaciers of the mist and the Berg were a stark reminder of the living nature of mountain landscapes.


Berg Lake Trail in Mount Robson Provincial Park - Good to Know
42 kilometers (26 miles)
730 meters (2400 feet) of elevation gain
Moderate
1-5 days
Everything! Alpine meadows, forests, mountains, waterfalls and Berg Lake
Late June to Late September
Watch this Berg Lake Trail Orientation video from BC Parks
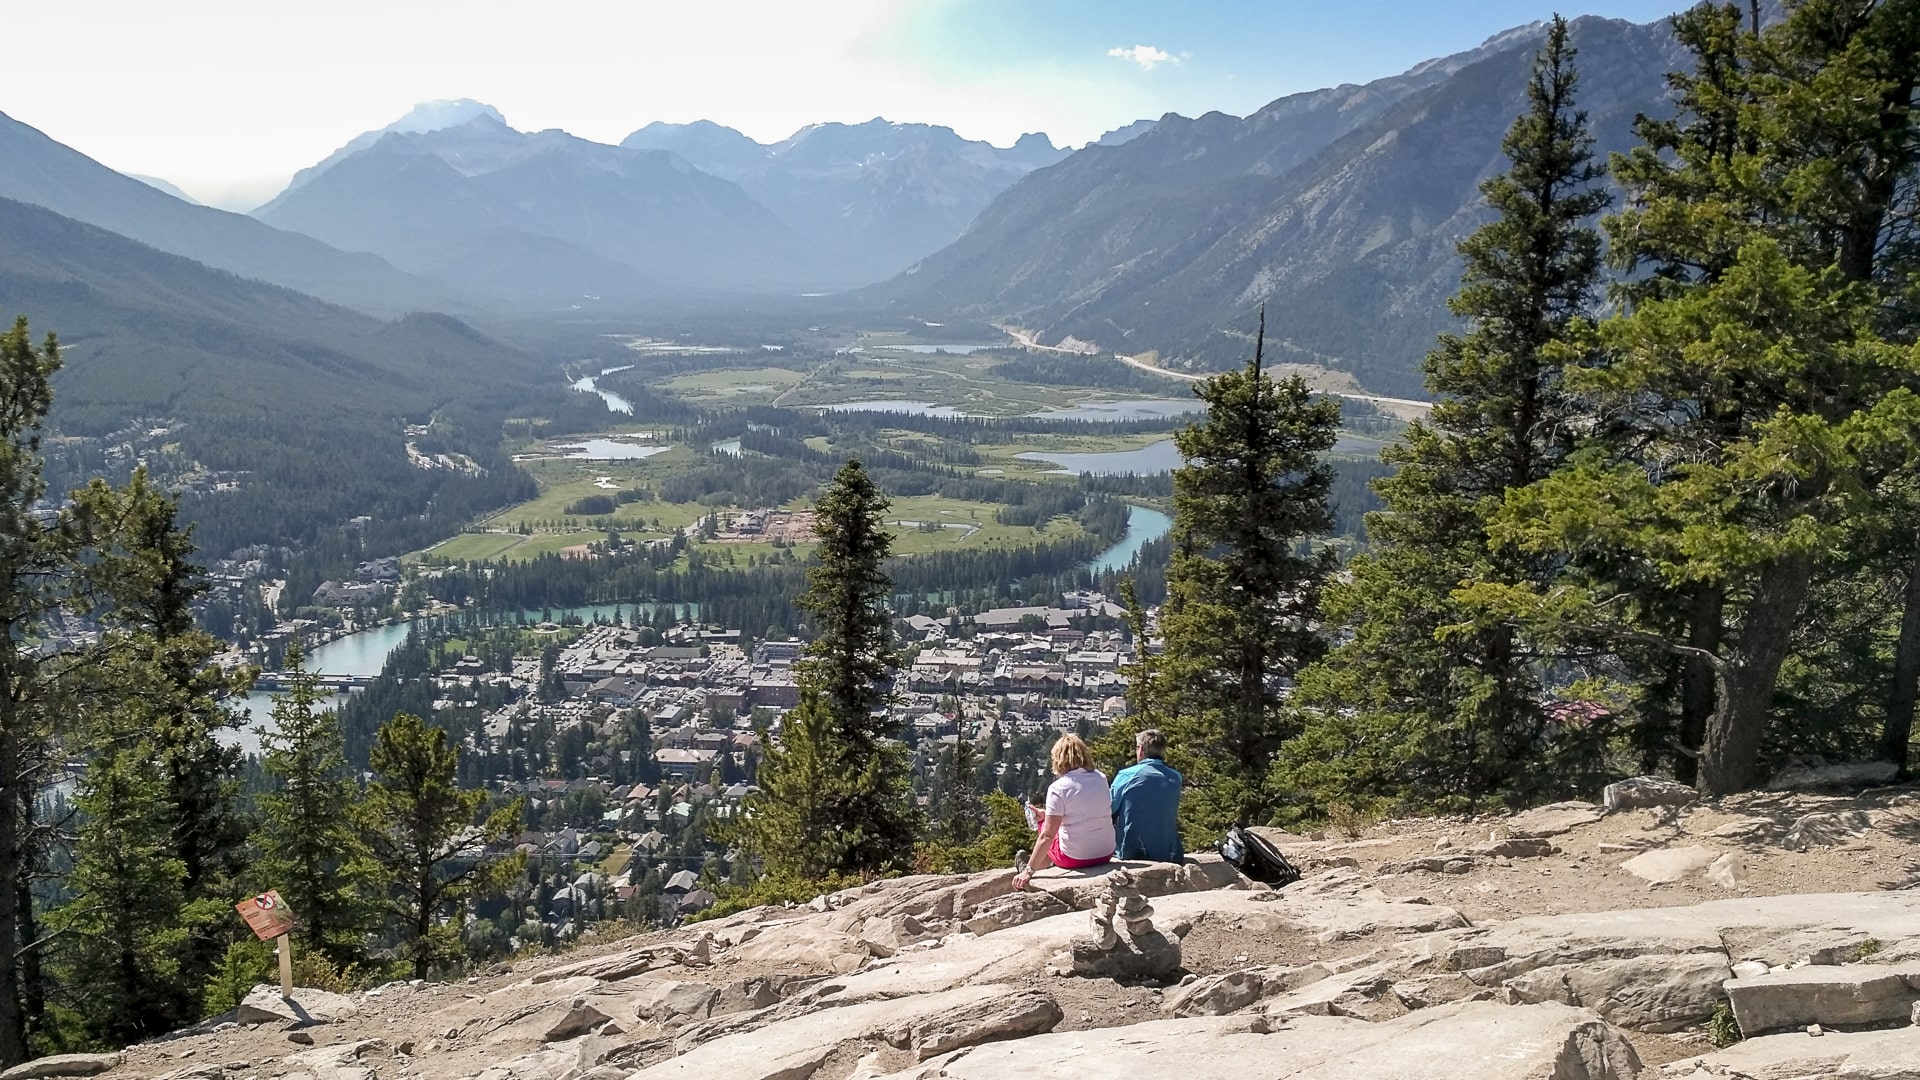
5. Tunnel Mountain in Banff National Park
It may seem weird to include Tunnel Mountain amongst this list of multi-day adventures, yet I cannot ignore the simple and instant rewards of this hike. Perhaps you are just getting into hiking and want to try it out, or you have had a day in Banff and you want to watch the sunset. This is an incredible, yet slightly challenging hiking outing that the entire family can enjoy.
Make this your day hike while visiting Banff
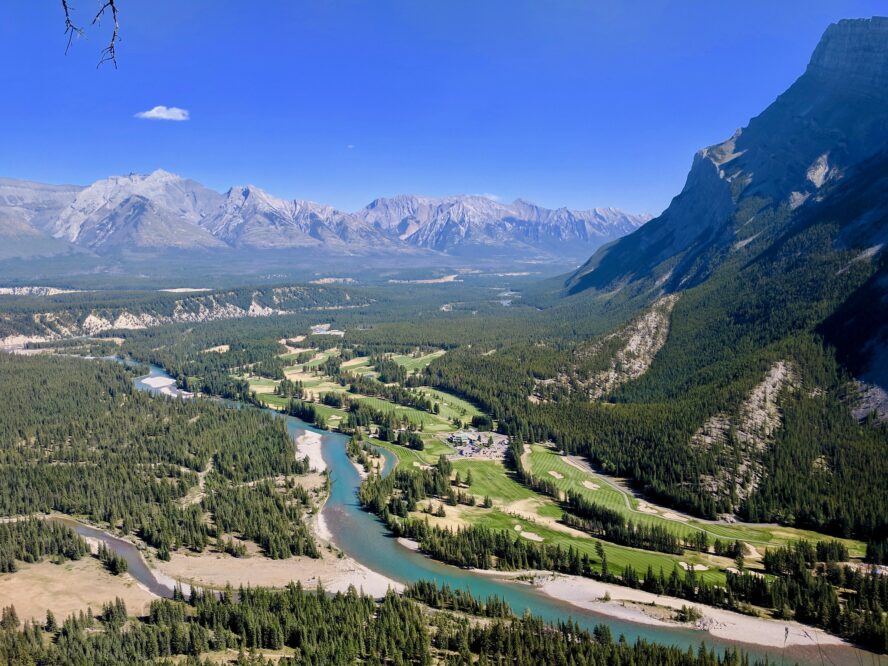
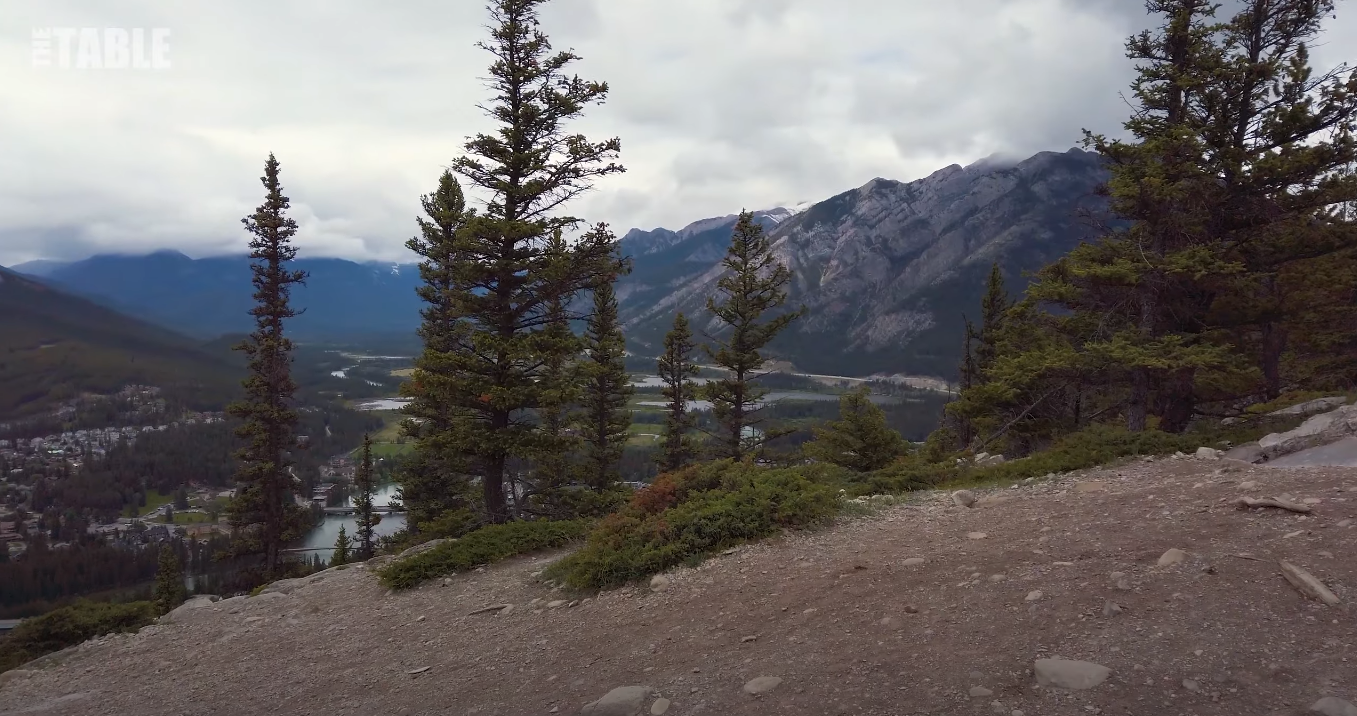
Tunnel Mountain is a high point above Banff that is surrounded by the impressive peaks of the Rockies. Often referred to as “Banff’s Smallest Mountain,” this “peak” positions you to get 360-degree views of the Bow River and Spray River Valleys. You can almost feel the world ripping apart while it created Rundle Mountain.
This hike is simple and it doesn’t require any camping permits, only a National Parks Pass, which you need to stop in Banff anyway. As with all hikes in the Rockies, nothing comes easy, this is a 300-meter vertical hike that has some steep switchbacks that will have you huffing and puffing. Yet, it is so worth it. Super simple, yet super satisfying.
No shortage of things to do in Banff
While this short hike might take up a few hours of your time, that leaves you plenty of time to explore all that Banff has to offer. The Banff & Lake Louise Visitors Center will give you plenty of info on accommodations and things to do. After your hike, you can grab a pint at the Banff Ave Brewing Co., grab a bite at the Elk and Oarsman, or go for some fancier upscale dining at The Grizzly House. Make sure to check out the Cave and Basin National Historic Site or check out the Banff Upper Hot Springs for a relaxing soak, which is conveniently located next to the Banff Gondola.
Climb a mountain right from town and get 360-degree views of Banff and the surrounding area from this short but super rewarding hike.


Tunnel Mountain in Banff National Park - Good to Know
2.3 km (1.5 miles)
300 meters (984 feet) elevation gain
Easy to moderate
1-2 hours
Well-built trail in trees
Lower Julian Road, or Tunnel Mountain Drive (road closed in winter)
Hiked year round; spikes needed in winter
Get all the info you need on the Tunnel Mountain Trail from Travel Banff, Canada
Advice for Planning Your Canadian Rockies Hiking Trip
There are a lot of factors to consider when planning out your hike in the Canadian Rockies. The biggest thing to keep in mind is camping. Make those reservations as early as possible! Other than that, here are a few other things you might be wondering about:
What is the best time of year to visit the Canadian Rockies?
If you’re heading to the Canadian Rockies to hike, the best time of year to visit is mid-June to late September. The height of the summer will always be the most popular time, so try and plan your trip at either the start or end of that window. This time of year ensures the best weather, but be warned, you can expect Mother Nature to throw in a curveball every once in a while. Snowing in July in the Rockies is not unheard of!
What gear do I need for hiking in the Canadian Rockies?
One must be prepared for every type of weather while hiking in the Candian Rocky Mountains as mountain temperaments change very quickly. It can be hot and sunny one minute and hailing ice balls the next. So, be prepared for all types of weather and ensure that your gear is appropriate for the mountains. Gore-Tex, first aid kits, blister kits, a water purification system, compass, a satellite communication device ( cell service is not good enough), maps and rescue plans are just the start.
For hiking gear specifically, you will need to customize our own list depending on the location, duration and time of year you’re hiking, but a general list will look like this:
-
- Day pack or backpack large enough to carry all the items listed
- Water bottle or hydration bladder (2L capacity)
- Lightweight hiking boots or shoes with two pairs of hiking socks
- Spare clothes for layering (base layer, mid layer, outer layer)
- Waterproof rain jacket and pants
- Sunhat
- Toiletries (sunscreen, bug spray, toilet paper, etc.)
- Bear spray
- Trekking poles
- Sunglasses
And most importantly, don’t forget your camera! You won’t find vistas like this anywhere else in the world.

Do you need a backcountry permit in the Canadian Rockies?
There are added fees associated with hiking and camping in Canada’s national parks. First, you need a daily or yearly National Park Pass to enter these parks. The Discovery Pass will get you into all 80 national parks for 12 months. For a family or group, the cost for the year is $140. Day passes cost $10$ for an individual of $20 for a group. Personally, I recommend getting the yearly pass as it may inspire you to go to many of the other amazing national parks Canada has to offer.
Then when camping in the backcountry, you must purchase a wilderness pass, which is $10 per person per night. There is also a small $11.50 reservation fee that will be tacked onto your total. When you purchase your pass, you must specify the dates, trails and campsites you will be using. You can find the details on how to purchase these passes for Banff National Park and Yoho National Park from Canada Parks.
Have plans A, B and C
Apart from the Tunnel Mountain trail, these hikes are huge undertakings and require serious planning. You must delve into the maps and decide what length days you and your crew are willing to undertake, decide on the dates and then book them early.
Booking your trip can be challenging. The booking opens at 8:00 am MST on April 16, 2021 and lots of dates can book up within five minutes — seriously, it can be that competitive! So, prepare a few different itineraries ahead of time as you need to book your campsites at the same time. Visit the Parks Canada website for more information.
Is hiking in Banff dangerous?
A frequent question of visitors to the Canadian Rocky Mountains is whether it is dangerous to hike in these areas. There are hazards, just like with any outdoor adventure, but when you plan properly and cover all your bases these hazards aren’t any more dangerous than hiking anywhere else. Wildlife and nature should be revered and respected wherever you travel.
One question that people often have is, “Do I need bear spray in Banff?” The answer is yes. And not just in Banff, bear spray is an essential hiking item wherever you hike in an area with bears, so that means all of the locations listed here. Bears are dangerous, yet if you take some precautions you will be absolutely fine. Carrying bear spray is a must, and just as important is having an understanding of how to use it properly. There are two easy ways to mitigate bear risks. Travel in a group and make noise while hiking. Personally, I have never had an uncomfortable meeting with any animal in the wild and I have spent a LOT of time out in nature.
Follow Leave No Trace Principles
No matter where you go adventuring outdoors or what the activity is, it’s important to always follow the 7 Leave No Trace Principles. This is especially important in areas that see a lot of visitors like the Canadian Rockies. If you pack it in, pack it out, and if you see trash, pick it up. Read these principles carefully and implement them at all times when adventuring outdoors.
Should I hire a hiking guide in the Canadian Rockies?
Whether you should hire a guide or not depends on your level of backcountry experience. Do you have your wilderness first aid? Are you an experienced hiker? There are always going to be benefits to hiring a guide for outdoor adventuring, no matter your level of experience. Guides can take you off the most beaten paths, show you the highlights, explain the history and they’re trained in wilderness first aid and know what to do in an emergency. If you want to make the most of your time hiking in the Rockies, consider joining a guided tour or hiring a private guide for your group.
Climb new challenging ascents, enjoy the 360-degree views, explore the wilderness and do it safely on a guided Rockies hiking tour!